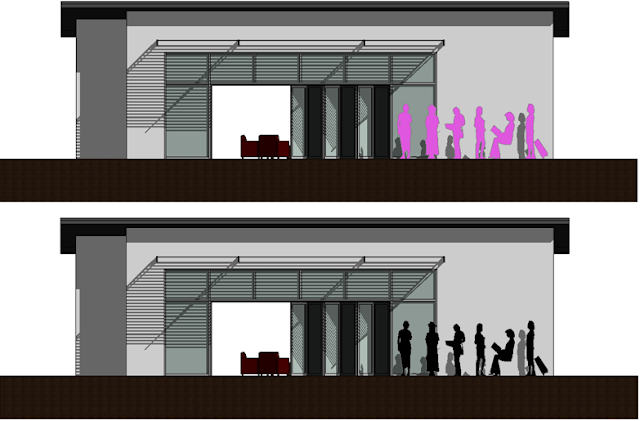
I'm sure that most readers of Revit Recess have wished that there is a bit more variety in the OOTB Entourage and even Planting content. This post will demonstrate that you do not only have to use the default families or purchase "better looking" ones - You are able to create your own.
We will start by showing how to quickly create silhouettes from existing Revit Entourage families. All six female Entourage types were placed in a blank project and a section created orientated towards it. This section was then exported to a DWG file format and imported into a new Detail Item Family.
The DWG file was exploded and a solid black Filled Region was created using the pick lines command. All of the exploded DWG lines were deleted to retain only the Filled Region, as well as to keep the family size as small as possible. To ensure that no redundant data or annotations remain in the family, the Purge command was also run.
This Detail Item was nested into the Front View of a Genetic Model family. As a Detail Item family is a 2D object, a very simple symbol was drawn on Plan View to indicate the direction the person would be looking towards on a project Plan View.
All six female Entourage types were loaded and placed into an existing project. Looking good?
What about those occasions when you require your Entourage to be highlighted in a different colour? Simply select the Entourage family > Right Click > Select Override Graphics in View > By Category. Choose your colour, et voilà!
Changing your visual style to Realistic will however not retain the graphical override. Should you then wish to represent your Entourage in colour, you will need to use Phasing.
This will only be a best-practice workflow if you are not using phasing on the project already, or if you create a copy of the live project for your visualization. By changing your Entourage to the Existing Phase and then modifying the Existing Phase's Graphic Overrides, you will be able to modify the Realistic Visual style's representation of your families.
Using the methods explained above with Revit 2017's Depth Cueing capabilities, creates quite a nice scene!
The second portion of this entry will show how a quick conceptual Planting family can be created, that is light in size, not detrimentally affecting your computer's performance, and minimizing the chance of causing your project to crash frequently. Does this sound familiar? Sketchup trees, AutoCAD 3D trees, exploded AutoCAD 2D trees....
The default Clump of Trees or Bushes AutoCAD block was imported into a Planting family Plan View, exploded and all DWG lines converted to Symbolic Revit lines.
The tree geometry was created using extrusions and revolves, with materials applied to it. When seen in a project context, this example is not the prettiest (I'll admit that) but this fits perfectly into the conceptual design stage of a project.
Using a Hidden Lines Visual Style with Sketchy Lines enabled provides an acceptable result for me.


Nice workaround!
ReplyDeleteAnyway here is my question: is it possible to create a silhouette-family for revit that is always facing the camera, so that it can be used for 3D-views, not just for elevations (as it's done in Sketchup e.g.) ?
Thanks vesparchitekt. It will be a bit of a workaround, but it is indeed possible. I will create a new post detailing the steps soon.
DeleteSuper! Thanks in advance!
Delete@vesparchitekt (and others who might come across this post): there's a revit idea on having "face me" entourage in revit: https://forums.autodesk.com/t5/revit-ideas/add-ability-to-display-entourage-as-billboards/idi-p/7260161
ReplyDelete