Many of my students have incredible Sketchup skills, mostly due to the fact that they were taught Computer Aided Design through Sketchup from their varsity days. I am sure that many of the Revit Recess readers themselves have completed an amazing design or two. For those with no Sketchup experience, do a quick internet search for something along the lines of "Amazing Sketchup Designs" to see for yourself.
However, if you want to, need to, or are "forced" to be at the forefront of technology (Let's be brutally honest, working in and through cloud is the future whether we like it or not) the likelihood of being exposed to the market leaders in design software in the workspace is inevitable. Now, before this post turns into a "Revit is best", "Microstation is better", or "Nothing beats paper impregnated with Potassium Ferricyanide", it is not the aim of this entry.
The aim is to discover how we can use Sketchup in conjunction with other software, such as Autodesk FormIt and Autodesk Revit.
Quite a while ago, Autodesk introduced FormIt as, in my opinion, a competitor to Sketchup. A number of advancements were made to the software since its release under the Autodesk brand, one of which is an add-in for Revit called FormIt Converter. Is it perfect? No. Is it getting close to perfect? Maybe. Is it usable? Definitely!
A quick search on Sketchup's 3D Warehouse site got me a simple-ish model of a Velociraptor skeleton.
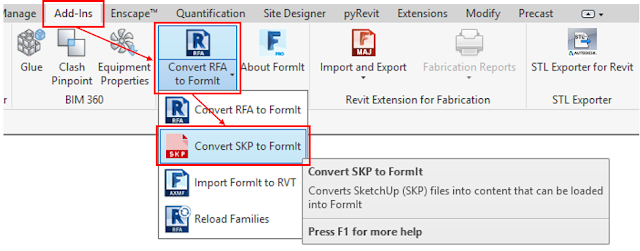
This Sketchup Skeleton will go through 3 steps in order for it to be useable in Revit. First of all, the FormIt Converter add-in can be found in the Add-Ins tab, FormIt Converter panel. When selecting the Convert RFA to FormIt icon, you will find four options: Convert RFA to FormIt, Convert SKP to FormIt, Import FormIt to RVT and Reload Families.
In order to use a Sketchup object in Revit, we need to Convert it to a Formit file first (.AXM file format)
You will be prompted to specify a path to the Sketchup file, as well as a folder path to where the FormIt file will be saved.
Depending on the complexity of the Sketchup object, the converter will provide either a Succeeded or Failed result. More about the failures will be discussed at the end of this post.
There are a few similarities between Sketchup and FormIt, one of those being that one works in layers. All of the Skecthup layers will be brought into FormIt.
Once the above process has run its course, it is time to Import the Formit family into Revit. This is where a negative comes into play. When downloading Sketchup objects, rather stick to a Sketchup 2016 format. I have only experienced conversion failures with Skecthup 2017 and 2018 objects. The second negative is that, due to a Sketchup 2016 file being used, all of those individual layers will be seen as nested families. In other words, go and make yourselves a couple of coffees while the upgrade process for each layer takes place.
The end result could look similar to the image below.
"Depending on the complexity of the Sketchup object" has been raised earlier. The more complex the object is, the more triangulations and quads existing in the geometry, the more likely it is that the conversion will fail. Another consideration is the overall file size: 2MB Sketchup file converted to a 4.4MB Formit file, which blows up to a 29.4MB Revit project file size (Fully purged)
I guess that the message I want to convey is that one can use Sketchup objects in Revit, but it should be used very sparingly. Even better, rather design those Sketchup objects in FormIt from the start. Not only will you feel familiar with FormIt's user interface, commands and geometry manipulation, but you will also drastically decrease your overall project file size.
Have a great new year folks!
Search This Blog
Saturday, 30 December 2017
Friday, 15 December 2017
Split Canvas Prints in Revit
This Revit Recess entry will explain the steps:
First of all, one will need to create canvas frames. This can easily be done by creating a simple extrusion with a height above finished floor level, frame height, frame width, and frame depth parameter; all instance based.
The next step would be to create a random pattern of these frames on a wall. Due to the dimensions of the frames being instance parameters, we can easily push and pull the frame sizes and heights to what we would like.
You might have noticed that no backing was created for the frames. This is where the "trick" comes into play. The backing can be created as a fully transparent wall, 5mm in thickness. This will be our canvas.
By changing the workplane of your view to the front face of the wall added in the previous step, you can place and resize a decal image of your canvas image to suit your needs.
The end result?
Subscribe to:
Posts (Atom)


