Search This Blog

Monday, 31 August 2015

Introduction to Autodesk Homestyler

"Design your dream home in 3D.
Express your creativity, find inspiration and make smarter home design choices, faster."

Autodesk Homestyler is a very useful application which will allow anyone to design their perfect interior. The website is user friendly and does not require one to be tech savvy, nor have intimate knowledge about interior design.

From the Home screen, one will be able to either access the 3D Room Designer function, or access the 3D Floor Planner function.

Below you will find some examples of users who have designed their dream home and/or room, have been creative, have found inspiration and have made smarter design choices, faster.

When Creating a New Design, Autodesk Homestyler will immediately provide a help window to assist you in using the website with all of its relevant commands.

To start off with, one can create any building shape, using the Rooms, Walls and Areas tool.


After a basic room shape has been created, we can now start decorating the interior. Quite a number of typical furnishings and decorations are available from the catalog toolbar.

I quite like the Itemsized Product List, which will allow you to see which materials, furnishings, decorations, etc. you have placed in your room.

 A Printable View will provide a Bill of Quantities of sorts.

Autodesk Homestyler is not only applicable to interior designing aspects. One can also do landscaping around your home.

I believe that for the average person who would like to investigate their options when designing a home, Autodesk Homestyler will provide a good understanding of the potential end result. This result can then be discussed with architects, interior designers, landscape architects and the like, for further refinement.

Thursday, 27 August 2015

Mullion Selection Options

There are seven right-click options when it comes to curtain wall mullions. The images below will show both the options, as well as the results.


1. Select Mullion > On Gridline

2. Select Mullion > Across Gridline 

 3. Select Mullion > On Vertical Grid

 4. Select Mullion > On Horizontal Grid

 5. Select Mullion > Inner Mullion

 6. Select Mullion > Border Mullion

 7. Select Mullion > Mullions on Host

Wednesday, 26 August 2015

Revit Array: Append to End


Often the execution of a command is not enough. There are times when slight adjustments needs to be made to the results of the command. Because most users do not know the adjustments one can make after a command has been executed, they delete all of their hard work and start everything over again. 
This is not necessary.


Let’s look at the Array command: After an array has taken place, when the array line is selected, we will see a checkbox in the Options Bar. This checkbox is called Append to End. We use this function to make slight adjustments to the existing array.


When looking at a linear array which has 4 array items, arrayed to the last point: Without appending the arrayed elements to the array’s end, more elements are added in between the start and end of the array.

However, when appending the arrayed elements to the array’s end, the array to last will act as an array to second. In other words, more array elements will be added to the last array point, with equal spacing in between.

The same applies to a radial array:

Append to end deselected:
 
Append to end selected:

Tuesday, 25 August 2015

Revit Keyboard Shortcut XML File

Scenario:
There is an AutoCAD user with 20 years experience, migrating to Revit. This user prefers using keyboard shortcuts over icons (Who doesn't?).

Solution:
* Let's get this out of the way first: Don't press Enter after typing a keyboard shortcut in Revit. Pressing Enter will make Revit redo the last command. Revit is not AutoCAD *

Revit's keyboard shortcuts can be accessed by browsing to the Application Menu > Options > User Interface > Edit (Keyboard Shortcuts). The typical workflow to assign keyboard shortcuts in Revit, is to search for a specific command, and then assign the shortcut in the Keyboard Shortcuts window. 

But what if we do not know which commands exist in Revit? This is where an alternative use for the Export command comes into play.

When opening the Keyboard Shortcut XML file, choose that Notepad should be used. The first thing to notice is the Command Name. Secondly, does the command have a Shortcut assigned? It should be noted that these are the only areas that should be changed in the file.

As can be seen from the example below, shortcuts were assigned to the Solid Extrusion, -Blend, - Revolve, -Sweep, and -Swept Blend commands.

When Saving and Importing the modified Keyboard Shortcut file, you will notice that the shortcuts are imported without any errors.

Personally, I prefer to rather add and change the shortcuts from within Revit, but some users, especially those who were on the level of creating AutoCAD .pat files via notepad, might find this method easier and/or quicker.

Monday, 24 August 2015

Introduction to Enscape


Modena Design Centres are proud to announce that we have become the sole providers for Enscape in South Africa.


Enscape creates real-time renderings out of Autodesk Revit. The software will also allow you to:

1. Produce fast, high quality renderings
2. Create impressive presentations
3. Explain your design quickly, effectively and efficiently
4. Study the acoustics of a room
5. Study the effects of sunlight throughout the day, and lighting at night

More information can be found by following these links: Modena Design Centres, or Enscape.

Wednesday, 12 August 2015

Custom Revit Furniture Design

It is no secret that I love Architecture and Design. What I do however love more, is to try and recreate or draw inspiration from: interesting rooms, buildings, and the like I see on this website. A few furniture pieces caught my eye, so I decided to make constructive use of my insomnia. 

These were the results:


Tuesday, 11 August 2015

10000 Revit Recess Views

What an awesome journey this has been! 10 Months ago Revit Recess was created and 10 months down the line, 10000 users took the time to visit the blog. Many, many thanks to each and everyone for motivating me to publish more Revit workarounds, tips and tricks.

Below you will find some interesting blog statistics: 

All Time Pageviews - In March this year, either 4000 people really struggled with Revit, or 4000 people really had some downtime on their hands


The Top 3 Visiting Countries to the blog are:
1. United States of America (Very well done)
2. South Africa (We are slowly catching up!)
3. United Kingdom


Internet Explorer seems to still be the preferred Internet browser, but very close on its heels is Chrome. I was quite surprised that 21% of users are using Firefox (I am a die-hard Chrome user)


As expected (Sorry Macintosh!) Windows clearly is the preferred Operating System for Revit users


To celebrate, here are some of my top Revit meme selections: 


Monday, 3 August 2015

Introduction to Revit Structural Analysis Toolkit

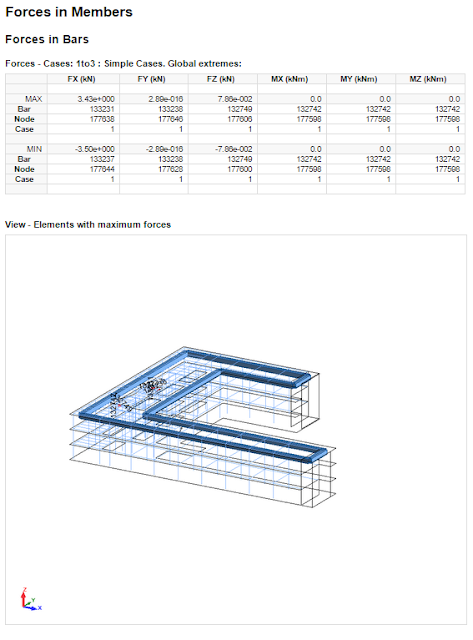
In order to use the Structural Analysis Functionality in Revit, we need to download the free add-in: Structural Analysis Toolkit first. Once installed, we will can run an analysis through the cloud from the Analyze Tab, Structural Analysis Panel.


When accessing the Structural Analysis Report through the cloud, we will be able to extract an analysis report which provides quite a lot of data. The report can be downloaded as  an HTML file, containing most of your required analysis results, such as the Structural Views, Loads, Load Combinations, Reactions, Displacements, Forces in Members, etc. The images below are quite self-explanatory, so I will leave the rest up to you.