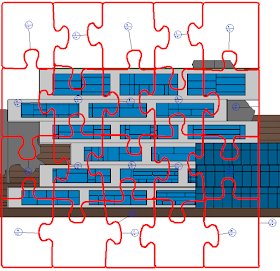
Creating interesting visualizations in Revit is a hobby of mine and this blog entry will form part of the Alternative Visualization Part 1 and Alternative Visualization Part 2 series. All of these posts focus on what Revit can natively do - Without using any other program, even Dynamo.
"There are no extra pieces in the universe. Everyone is here because he or she has a place to fill, and every piece must fit itself into the big jigsaw puzzle" - Deepak ChopraThe first example evolved from seeing how one can create a puzzle effect visualization to investigating what effects multiple callouts by sketch would have on project file performance. However, lets see how it was created first, before looking at the negatives, shall we?
A puzzle grid was created and callouts by sketch were added using the individual puzzle piece lines as placeholders for the callout boundaries.
Making use of wide detail lines added a bit more depth perception when all pieces were placed on a sheet. The completed image provides quite an interesting result.
The negatives to this method? First of all, it takes a loooong time to set this up. A callout by sketch does not have the functionality to create circles or arcs - Thus a rounding needs to be created by sketching many small straight line segments. Having many of these callouts by sketch drastically affects the projects performance as well.
"The sky takes on shades of orange during sunrise and sunset, the colour that gives you hope that the sun will set only to rise again" - Ram Charan
Can you create a visualization where only a specific area show in hidden lines, and everything else in colour? The short answer is yes.
We will yet again make use of a callout by sketch, but this time a masking region will come into play as well. With a few visibility edits, the border/boundary lines of the callout and masking region was hidden.
The callout view itself was changed to a hidden lines representation, and its boundary hidden as well.
And the end result?
"I love everything that's old - old friends, old times, old manners, old books, old wine" - Oliver GoldsmithPaging through a friend's printed visualization portfolio I wanted to do the same in Revit. Partly due to the challenge and partly because we need to save some trees.
For this challenge all that was needed was a book family, and some decal images.
Selected 3d views were rendered and saved as image files, and cropped to simulate the image being printed over two pages. Aligning them together was less of a hassle than I initially thought.
However, a strange thing happened when I tried to RayTrace the view - It looked like Revit was cutting through my book.... It could be due to the curvature of the pages or it might be due to something obscure.
None the less, I created a test render of the same view with the latest Enscape version and I was more than just satisfied with the result!
Have a great week, folks!


No comments:
Post a Comment