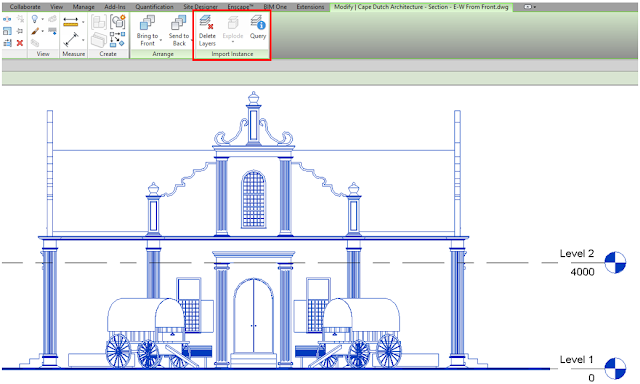
A little known function in Revit, when one would like to determine the properties of a CAD layer, is called Query. We can access this function by selecting the CAD link, and navigating to our Import Instance Panel in the ribbon.
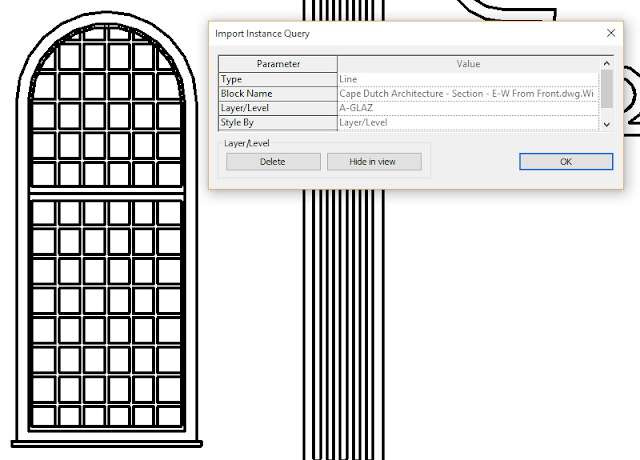
After starting the Query command and selecting any CAD line, the Import Instance Query window will activate. We will be able to determine the Block Name, Layer/Level, and Style By.
We will also be able to either Delete or Hide a specific Layer/Level in the view.
This is an extremely useful function we can utilize to manipulate the CAD drawing in Revit. However, this manipulation is completely dependent on the AutoCAD drawing's state of health. If AutoCAD Layers have not been used correctly, or not used at all, this Revit function will become moot.
Search This Blog
Friday, 27 November 2015
Wednesday, 25 November 2015
Changing Temporary Dimension Sizes
OOTB (Out Of The Box), temporary dimension sizes are 8mm, which can at certain levels of zoom be too small to select and change. Similarly, when trying to edit a temporary dimension on a very busy drawing, you might actually select model geometry. The Revit MEP folks will know exactly what I mean!
The results will look as per the image below:
Unfortunately, changing the temporary dimension size will not affect the size of MEP connectors - Only the graphical connector information.
This was, is, and will remain very high on my Revit wishlist for a future release.
Wednesday, 18 November 2015
DWF Markups in Revit - Design Review 2013
Autodesk Design Review 2013 is a very useful program which allows us to:
In Design Review, a number of markups can be made, as indicated by the images below
Once markups have been completed in Design Review, the DXF file can be linked back into Revit.
The DXF markup will be linked as an "overlay" onto the Revit sheet, which makes revising the project much easier, especially when working in the view through your sheet (Activating the view).
Autodesk Design Review 2013 can be downloaded by following this link.
Note: Even though the latest version of Autodesk Design Review is 2013, it is still widely used as the preferred markup tool
"Accelerate your design reviews on your desktop with Autodesk® Design Review software. It’s the free*, all-digital way to view, mark up, print, and track changes to Autodesk 2D and 3D files—without the original design software. Work with a wide variety of file formats, including DWF™ and DWFx, DWG™ and DXF™ (requires installation of free DWG TrueView™ software) and Adobe PDF, as well as several image file types including .bmp, .jpg, .gif, .pcx, .pct, .png, .rlc, .tga, .tif, .mil, .cal, and more." - AutodeskWe can export sheets to a DWF or DWFx format, which will then become readable in Design Review. This can be accomplished through the Application Menu.
In Design Review, a number of markups can be made, as indicated by the images below
Once markups have been completed in Design Review, the DXF file can be linked back into Revit.
Autodesk Design Review 2013 can be downloaded by following this link.
Note: Even though the latest version of Autodesk Design Review is 2013, it is still widely used as the preferred markup tool
Tuesday, 10 November 2015
How up-to-date is your Software?
More than often, when any client requests support for any software flavour, three main questions will be asked:
1. Have you installed the latest service packs for your software?
2. Have you installed the latest service packs for your OS (Operating System)?
3. Have you installed the latest drivers for your hardware?
These questions might seem like silly questions. However, once confirmation has been received that these have been attended to, one can start looking at other reasons why software has been crashing, is performing slowly, or why the user cannot perform a command.
One can update all Autodesk software through the Autodesk Application Manager. I have actually pinned by Application Manager to my Windows taskbar.
A little tip if you have a myriad of Autodesk software products to update: We have the option to sort all updates to Severity. This will ensure that the most important updates will be listed to the top of the Application Manager.
Thursday, 5 November 2015
Revit 2016 Release 2 - Autodesk Raytracer Improvements
In the latest Release for Revit 2016: Release 2, Autodesk Raytracer has been improved to a large extent. One is now able to control not only the Rendering Quality, but also the Light and Material Accuracy as well as the Render Duration.
1. When choosing Autodesk Raytracer as your render engine, and Customizing your render settings, you will be able to Edit these settings.
2. In the Render Quality Settings window, you can choose whether your Light and Material Accuracy should be Simplified, or be set to Advanced
3. Render Quality can be set to one of three options:
3.1 Render by Level (1 - 40)
3.2 Render by Time: 32768 minutes / 546.133 Hours / 22.76 Days
3.3 Render until Satisfactory
Comparison Example: Render Level 1 versus Render Level 20:
Comparison Example: Render by Time - 1 Minute versus 10 Minutes
Example: Render Until Satisfactory
Subscribe to:
Comments (Atom)


